
Our themes include a special way of defining presentation page columns contents. This method allows for an infinite number of columns (and improved support for multi-language plugins).
The theme comes with 6 sample columns when no content is yet set. These 6 columns will disappear once you start adding your own content.
To get started, navigate to theme’s settings page, eg. Appearance > [Theme] Settings.
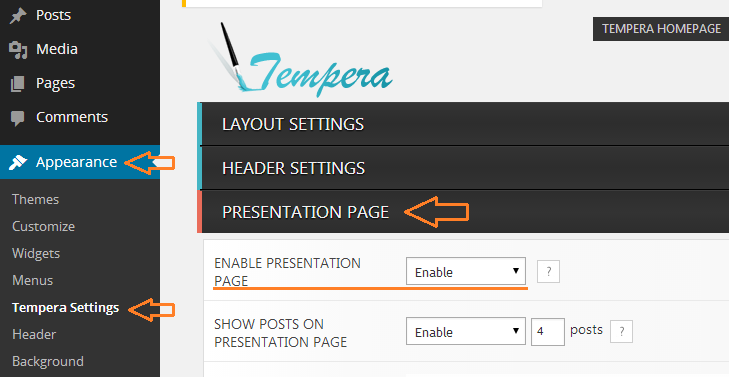
Open the Presentation Page section to see all its options (make sure the presentation page itself is enabled if you intend to use the slider and/or columns). Scroll down to the Presentation Page Columns group of options.
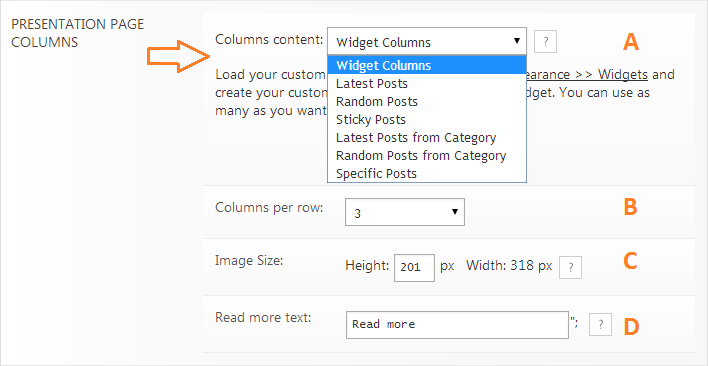
A. The first (and most important) option is choosing the source for the columns content:
- manually defined content – Widget Columns
- automatically generated from:
- latest posts from all categories
- random posts from all categories
- sticky posts from all categories
- latest posts from a category
- random posts from a category
- specific posts or pages (by IDs)
B. Defines the number of columns per row the theme should display. Add the right number of columns so they correctly divide to the value you set here. Also make sure your content fits if you set a large number of columns per row.
C. Lets you set the height of the column image. The width is dependent on the total theme width and the number of columns per row, so this is automatically computed. Use these numbers when you create and upload your column images.
D. Defines the column button text.
Navigate to Appearance > Widgets.
Note the Cryout Column (E) widget and the Presentation Page Columns (F) widget area.
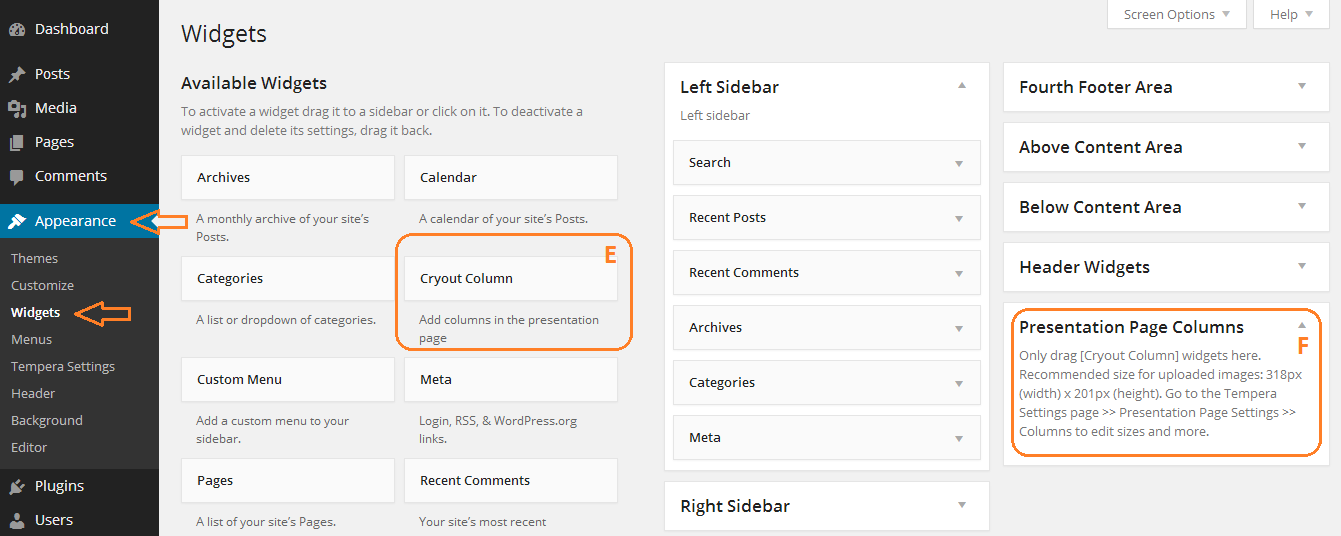
Drag and drop a Cryout Column widget to the Presentation Page Columns widget area. This will open up the widgets field so you can start adding content to your first column.
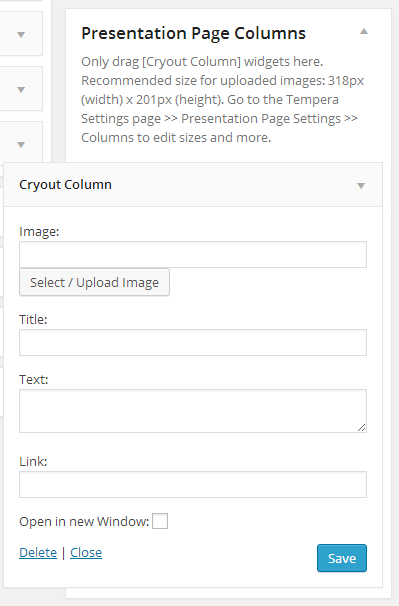
- Column image URL – type in manually or select image from the Library. Respect the suggested image size or your columns will look distorted.
- Column title – enter column title or leave blank to hide
- Column text – enter column text or leave blank to hide
- Column link – enter link columns sends to on lick or leave blank to disable
- Check box to open the link in a new window/tab.
When done click Save and your new column should become visible on the frontend.
To make sure your posts are valid for columns content, check that the selected posts:
- have a featured image set; the image should be correct size as set in the Columns settings (or larger so that WordPress can generate the needed crops)
- have a title (if you wish them to display a title)
- have content (if you wish the content to be displayed as column text)
The columns will link to the posts themselves. There is currently no way to define custom links.
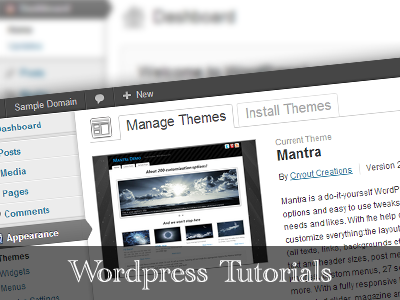
Note: These instructions apply to Tempera, Nirvana and Parabola (since v1.7).
Hello– Can anybody help with this? I am trying to add an image gallery to the bottom of the presentation page, (icons to associations) and thought the easiest way would be to make a sticky post. But, when I change the setting for blog posts on the front page– nothing. Any ideas– or is there an easier way to add a gallery of six thumbnails to the front page (or all pages, for that matter.) Thanks
Followed the instructions to the letter … I still can’t get anything to appear in the Presentation Page Columns, not plain text, titles, images or links …. I have no idea what I am doing wrong
Re: March 21st, 2015 at 17:35 (UTC+02:00)
I just want to say that I figured it out Zed. Took all day, cause I’m a slow learner but I got now. I love the theme and so glad I found this thread.
I want to reduce the space between the slider and column widget on presentation page. I have been trying very hard to figure this out. Can you please explain?
Hi Zed!
What I have to do, I using post-bases colums and titles are over of image borders, and I can’t click on hyperlink on it.
I don’t mean to sound churlish, but is it possible to remove the reference to Cryout and WordPress in the Nirvana footer?
I would like to use the presentation page Cryouts to link to slideshows… galleries. This is for a photography website. You can see what I’m talking about at http://www.grpphotography.com/. You can see how the Cryouts are set up but I can’t get them to act as a link to a site page that will be a corresponding gallery or slideshow.
i would like to know this as well. would be nice if the image could act as link to a site.
Randy, when you have created the cryout columns (in the widget area) you need to add the url back to the appropriate gallery/page in the box that says “Link:” I am an utter novice at this website stuff but have the images on our presentation page linking to galleries and other pages no problem at all.
LOVE the animated columns! But I would like to know how to change the settings.
I want it to be a large image split in six (3×2 boxes), and when hovering one of those parts, the chosen pic and text is supposed to show. Today there is only the six images with text that shows, even though I chose the animated version.
Please help!!
Somehow my post disappeared. I am having trouble to display the 3 columns in 1 row (Nirvana-template) Your example page is working just fine, but as soon as I use the widget columns as you describe on this page, the photo’s are being displayed in 1 column instead of 3, although I tell them to display in 3. When I delete the 6 in the widget columns, your example page appear again in the correct lay-out. I added the website in question. Could you please help me out.
I have exactly the same problem as Helma. Everything is set as per your above instruction/how-to and still does appear in one column.
@ Helma
If you found the solution meanwhile please share it here. Thanks.
Hello again … I do not know how this happened, but all of a sudden everything was displayed correctly. I am wondering if my hoster was a bit slow but my problem is solved now.
Unfortunately my problem is still unsolved. @Zed, if you could please give me directions, I would appreciate it. It can be seen at the website I mentioned in the details.
As soon as I fill in the six examples photos in the widget (cryout widget columns) the photo’s show in 1 column below eachother, although I say 3, instead of two pretty rows as your template. When I delete the 6 in the widget, they show properly but with your example text. What am I doing wrong?
same problem here :<
Hi there,
How can i put my text into the columns. Because now it’s below the columns.
Could you explain your question a bit more?
I think you are seeing the text below because of the resolution you have on your screen, since the theme is responsive, trying zooming out and you will see the text in the boxes.
is there any way to make cryout columns work in any other place besides presentation page? I cant find a plugin like cryout columns for widget and this would help me tremendously thank you!
There is portion of my blog that has small letters. Please advice me how to solve this. Thanks.
What portion?
How can I set a widget in the right column to appear on on certain pages on my site? Such as having an html widget just appear in the right column of my contact page? Is this possible?
Thanks,
Jim
I am trying to follow these instructions to change the cryout widgets. I have entered in the info as described, but when I go to the presentation page it still has the default cryout widgets there. What am I missing?? Thanks!
Hello. Is there a way to place the columns below the first part?
hey everyone
i’m trying to upload a new theme on my blog called ‘nirvana’
but when I try to edit anything and save, it just says error 404
Not found Apologies but the you requested could not be found.
Not sure what I’m doing wrong if anyone has had this problem I’d love to know how to fix it.
Update to the latest 0.9.9.10 or leave the Custom Footer Text field empty before saving to avoid a very probable issue you may encounter on your particular hosting service.
How do i modify the text portion inside the columns? I need bullet points or sentence spacing. thank you
The text entered on any area of the presentation page does not currently use the standard formatting that is present on other sections (like bullets, indentation, alignment). This was done to allow absolute control on the styling of the presentation page contents, but we may change it in a future update as we’ve got several requests for it.
Hola, gracias y enhorabuena por el tema. Estoy haciendome una web y cuando la paso a un mobil o una tablet se ve mal. como puedo arreglarlo? gracias.
http://www.edsconcierge.com
You need to make sure that the custom content you add (like the one in the footer) is also responsive (has styling making it arrange/look properly on mobile devices).
I just created my test website with the nirvana template. I made the home page a static page, set up the presentation page with widget columns then went into the widgets, added 3 cryout columns into the presentation columns section, then added content however when I go to my home page, it is just a blank page. What am I missing?
Is the “Your homepage displays” option under Settings > Reading set to “Your latest posts”?
How do I add spaces or bullet points to the ‘text’ portion inside the columns? Thanks
Thank you so much for the theme! I’m very much enjoying it.
http://www.clovisbookbarn.com/
Hello,
I love your theme! Thank you.
I am working on my presentation page and uploading images to the cryout columns but they are covered in grey and unreadable – it gets darker and lighter depending if I am hovering over it. I think this must be a setting but I can’t locate it.
I appreciate your help!
Hi.
I’d need to see your site. The default behaviour is for the columns to darken a bit when hovered, but text should remain readable.
Is there a way to insert video on the presentations page? on the space above the banner maybe?
All pages have two above and below content widget areas (in which you can insert any widgets, including the Text widget which allows you to display HTML as well). The only other thing to do is to control the widgets to only be visible on the homepage.
Zed, even after setting a widget to display on all pages, it doesn’t appear on the presentation page. Are those above and below content widget areas enabled on the presentation page? Thanks.
how can i make 5 column in a row. Its urgent…
You cannot. The themes displays up to 4 columns per row.
Hi,
How can I create something like what you have on the Tempera FAQ (http://www.cryoutcreations.eu/tempera/tempera-faqs/) on my post pages? i.e. my readers have to click on a link to open a drop-down text. Sorry I’m not sure what it’s called. Thank you in advance.
We use WP Super FAQ for those pages.
Thank you for such a beautiful, and smooth theme.
Is there a way to isolate the columns into 3 different rotations?
Presently I have an ‘About Me’, ‘Gallery’, and ‘Blog widgets in place. I’d like to find a way to have each rotate images within their category – particularly the gallery widget.
Thank you,
Asha
Hi Asha, Did you ever find a way to rotate?
Hi, I have changed the column pics and have text in it when I hover over the pic. However, I can not find where I can add text to the column pics that will show underneath the pics like in your example and the ‘read more button’ does not appear. Can you please help me?
I need to change the layout of FP columns.
http://www.t-shirtstore.ee/temperapre.jpg
1) how can I change padding around them? let’s say I have 3 columns – and they should be divided equally to same width as page itself / slider. On the pic – 1-2-3
3) how can I add different width and height images? On the pic – 4-5-6 (different width at this time
Hi,
I changed the height of the image size but it doesn’t change on the website?