
Our themes include a special way of defining presentation page columns contents. This method allows for an infinite number of columns (and improved support for multi-language plugins).
The theme comes with 6 sample columns when no content is yet set. These 6 columns will disappear once you start adding your own content.
To get started, navigate to theme’s settings page, eg. Appearance > [Theme] Settings.
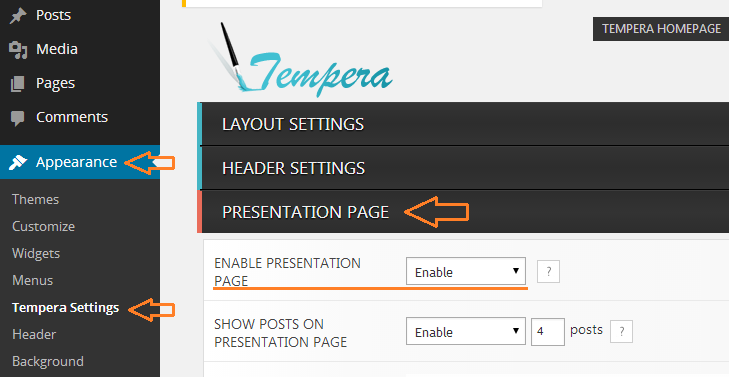
Open the Presentation Page section to see all its options (make sure the presentation page itself is enabled if you intend to use the slider and/or columns). Scroll down to the Presentation Page Columns group of options.
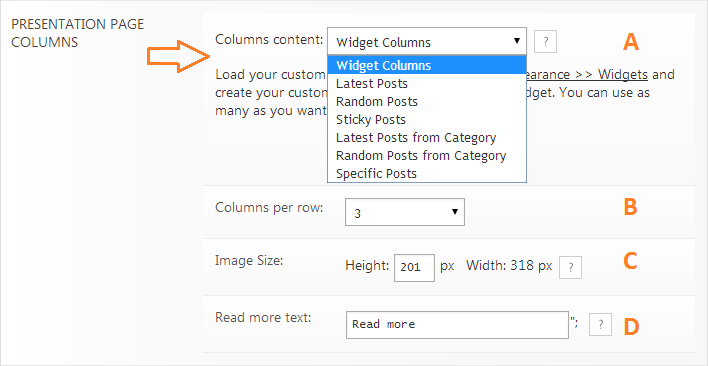
A. The first (and most important) option is choosing the source for the columns content:
- manually defined content – Widget Columns
- automatically generated from:
- latest posts from all categories
- random posts from all categories
- sticky posts from all categories
- latest posts from a category
- random posts from a category
- specific posts or pages (by IDs)
B. Defines the number of columns per row the theme should display. Add the right number of columns so they correctly divide to the value you set here. Also make sure your content fits if you set a large number of columns per row.
C. Lets you set the height of the column image. The width is dependent on the total theme width and the number of columns per row, so this is automatically computed. Use these numbers when you create and upload your column images.
D. Defines the column button text.
Navigate to Appearance > Widgets.
Note the Cryout Column (E) widget and the Presentation Page Columns (F) widget area.
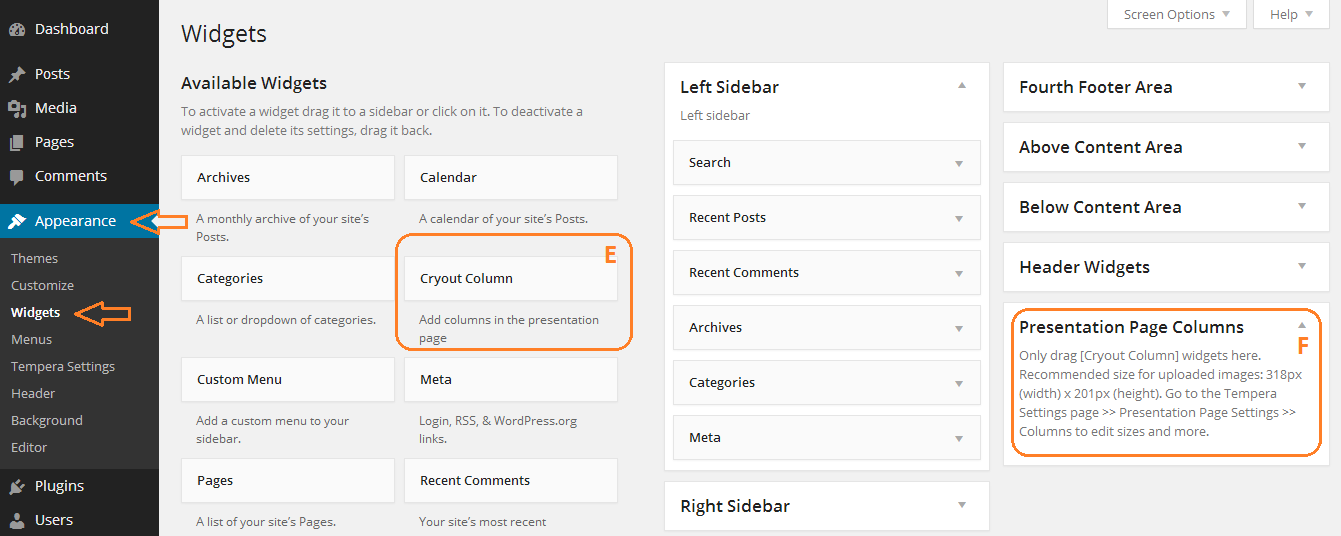
Drag and drop a Cryout Column widget to the Presentation Page Columns widget area. This will open up the widgets field so you can start adding content to your first column.
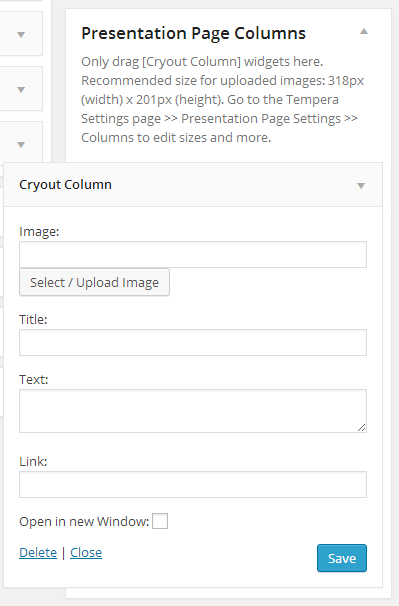
- Column image URL – type in manually or select image from the Library. Respect the suggested image size or your columns will look distorted.
- Column title – enter column title or leave blank to hide
- Column text – enter column text or leave blank to hide
- Column link – enter link columns sends to on lick or leave blank to disable
- Check box to open the link in a new window/tab.
When done click Save and your new column should become visible on the frontend.
To make sure your posts are valid for columns content, check that the selected posts:
- have a featured image set; the image should be correct size as set in the Columns settings (or larger so that WordPress can generate the needed crops)
- have a title (if you wish them to display a title)
- have content (if you wish the content to be displayed as column text)
The columns will link to the posts themselves. There is currently no way to define custom links.
Note: These instructions apply to Tempera, Nirvana and Parabola (since v1.7).
Dear Team,
How do I insert a “” in the title of the Cryout Column widget?
I tried to insert: , ..
Unfortunately the html is not read but the tag is shown
I need to start over with the title / subtitle
Thanks in advance
All the best
Manuel
Would like to be able to have the presentation page columns automatically, slowly rotate, like 8 positions per day, is this possible?
it is possible to use these “front-columns” in other page?
Example: the menu has 3 pages
in two of them, use a differente “front-columns”??
thanks
Have actually resolved this thank you very much. Did a reboot, and cleared the cache. Something I had been doing much have been stopping the actual save from happening. Continuing with the test. Awesome product so far!
Howdy. I am using WordPress 4.8.3 running Mantra theme and loving the theme package immensely. Undoubtedly the best I have tested out so far. Have encountered a small glitch on the presentation page. I am unable to save a link for a slide or a page column.
Hi, how will home page add in widget and calander help me i will try local but live page working