
Our classic WordPress themes feature a complex and highly configurable slider which can render either custom defined slides or ones generated out of regular posts. With the enforcement of customizer-based theme options, we had no way of keeping most of this functionality (since repository themes are also not allowed to create custom content). All we could have included with our new line of customizer-based themes was the slider-out-of-posts functionality. However we felt this wasn’t enough.
So we decided to do the next best thing: write our own slider plugin and provide it with the theme. This is how our Serious Slider was born (and even made it to the WordPress.org plugins repository).
Serious Slider is a fast and slick slider plugin which relies on WordPress’ custom post types functionality to provide a simple and efficient slide management system. We’ve also chosen Bootstrap (albeit somewhat tweaked) as a basis for its design and visual functionality to give it maximum efficiency and minimum JavaScript overhead in all browsers.
And while still young and with plenty of room for new features, we feel our slider plugin has already surpassed the capabilities and robustness of our previous integrated slider. To convince yourself of this, you can give it a try right now.
Installation
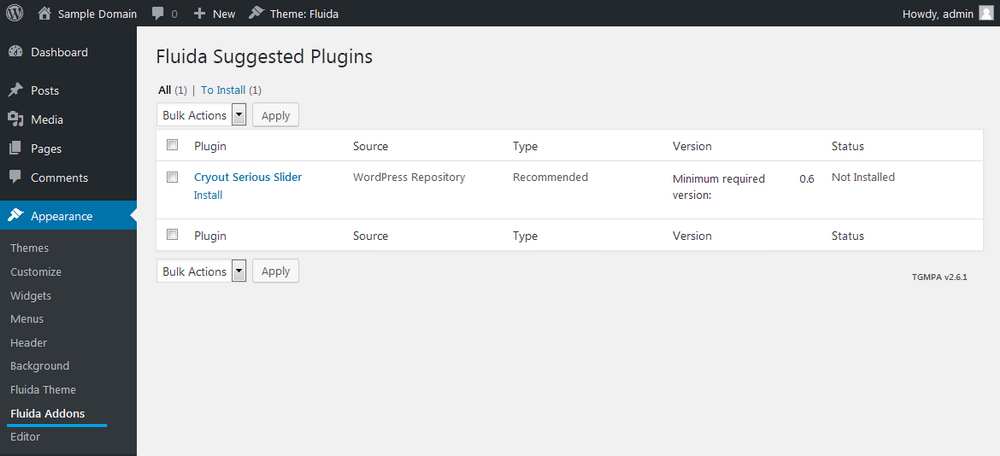
Upon activation, our customizer-based WordPress themes will recommend their companion plugins through a dashboard notification. Click on Begin installing plugin and follow the steps to install and activate Serious Slider (you can chose to install the other companion plugins as well – read about the usefulness of the Force Regenerate plugin here).

If you’ve previously dismissed this notification, do not fret. The library we use to recommend plugins provides a convenient plugins installation page, under Appearance » [Theme] Addons
The plugin can also be used totally separate from any of our themes. In that case you can install it like you’d install any other WordPress plugin, through the Plugins > Add New interface (simply search for Serious Slider).
Once installed and activated, the plugin will create its own content section in the dashboard sidebar titled Serious Slider (right below Pages).
 Under here there are several subsections with the plugin’s functionality: the slides list page, the add new slide page, the slider management page and an about the plugin page.
Some terminology clarifications:
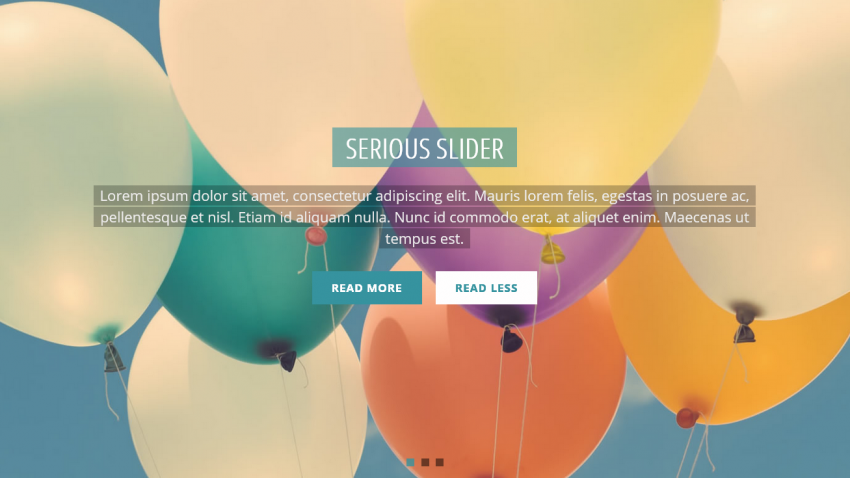
- slide – is the content part (made up of an image, a title, some text and perhaps a custom link) that’s visible on the site (for a longer or shorter time, depending on configured duration);
- slider – is a collection of slides (consider it a category of sorts); the slider is the entity that you are selecting/inserting to display in your site’s content; its associated slides are the ones being displayed;
The slides are listed under All Slides, while the sliders are found under Manage Sliders.
You can have multiple slides and multiple sliders, with one slide only being associated (part of) a single slider at a time.
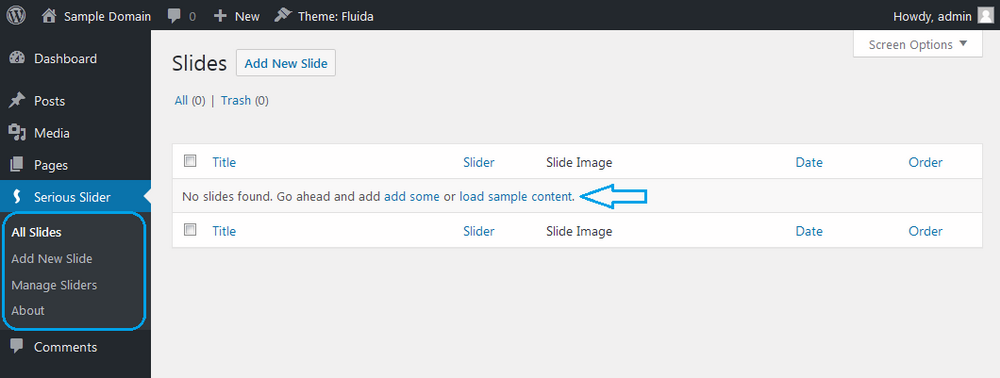
Sample Content
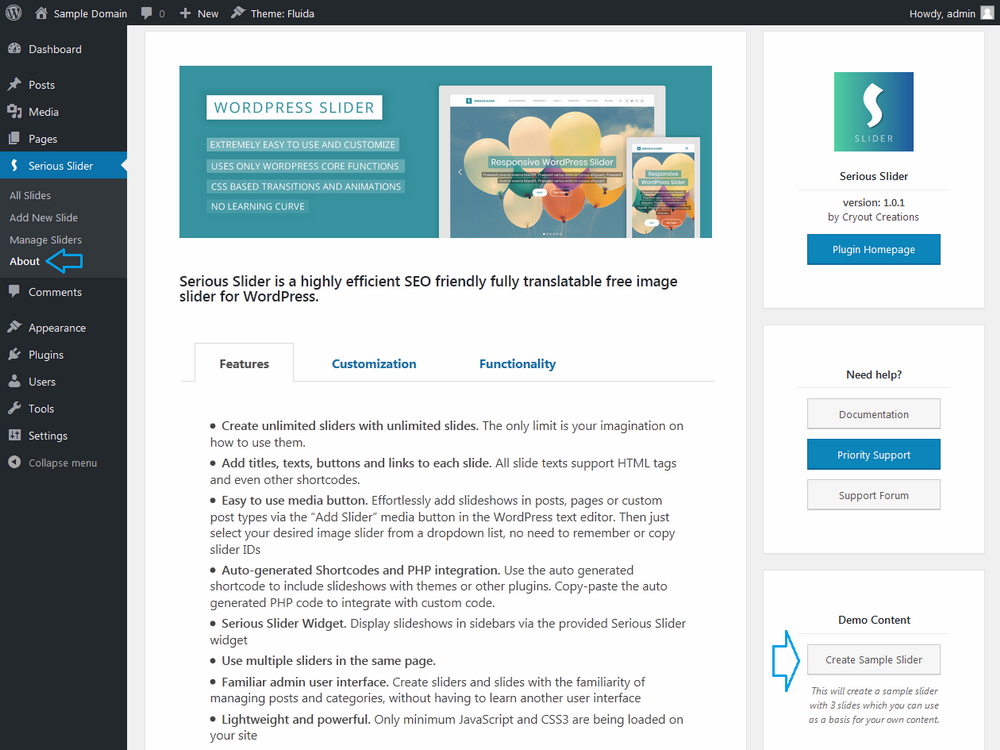 When there is no content available the plugin will suggest adding some or loading the sample content. Click the underlined link on the All Slides page and then the Create Sample Slider on the plugin’s info page to load sample content. The suggestion link is hidden when you do have slides, but the sample content button is always available on the About page if you ever need to use it.
Using the sample content is a very good way of getting started as it provides a basis for your own sliders and slides.
Sliders
With or without sample content, start by creating a new slider (or customizing an existing one) from the Manage Sliders screen.
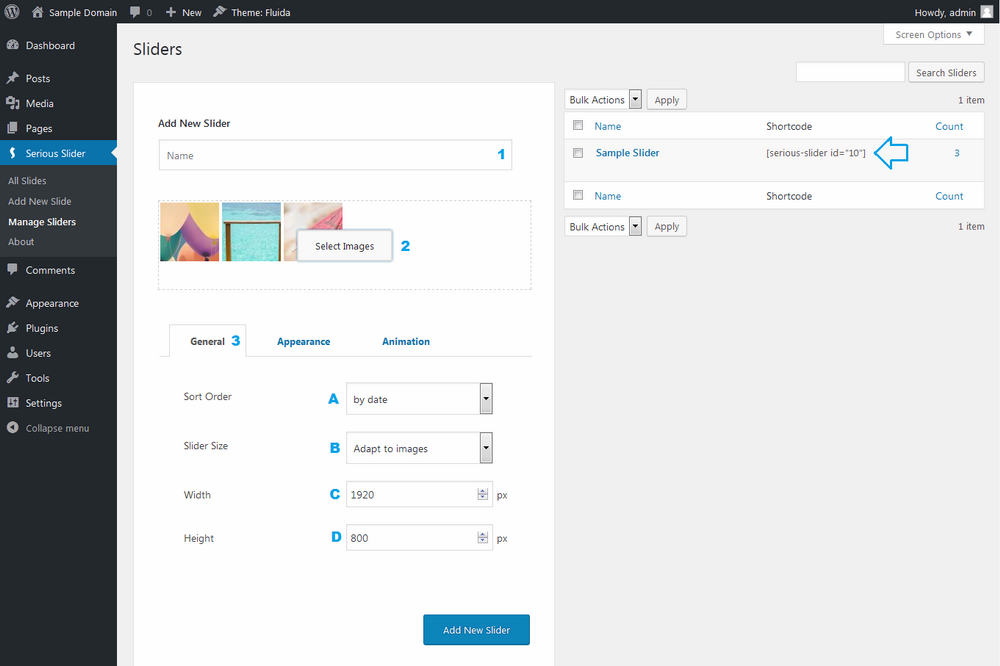
1. Title
Here a slider’s configuration parameters can be defined. The Title field is used for administration purposes (to identify the slider) and is not publicly displayed anywhere.
2. Images selection
Click Select Images (2) button to quickly create a slider from a selection of images without adding individual slides manually. The plugin will automatically use certain information from the images during slides generation: image filename as slide title and image caption (or image description if caption is not set) as slide text. These can be adjusted later by editing the individual slides.
Existing sliders are displayed on the right side of the page (together with their shortcode call for in-content use – indicated by the arrow).
The rest of the configuration parameters control the slider’s appearance and behaviour:
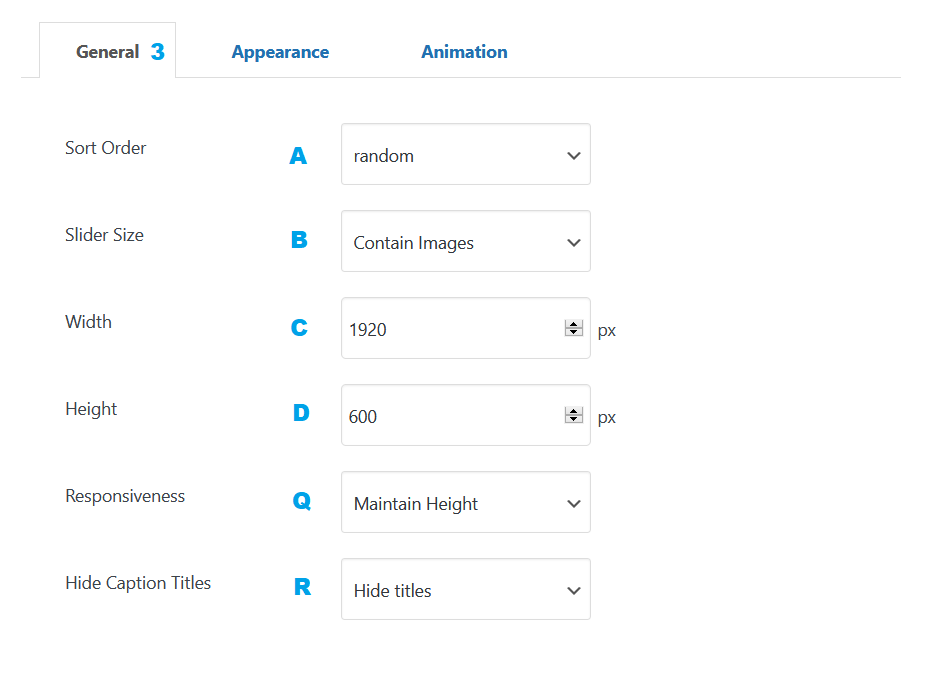
3. General Options
- Sort (A) and display slides within the slider by publish date (newest to oldest) or order (low to high)
- Slider size (B) can be set to:
- adapt to images – keep width, resize slider dimensions according to image heights
- contain images – keeps configured slider width and height and resizes (shrinks) slide images proportionally to fit within the values
- force images to size – hard resize images to the configure slider size values, even if aspect ratio distortion will occur; we strongly recommend the dimensions set match those of the slides images used with this mode
- Slider width (C) (in pixels) – this sets the maximum slider and slides width on the site; the slider is responsive and will shrink to fit the screen width when needed
- Slider height (D) (in pixels) – this sets the maximum slider and slides height; it only matters when the size option is set to force constraints
- Responsiveness (Q) behaviour can be set to:
- maintain height mode – is intended for sliders where the caption is more important than the slide image; this mode maintains the slider height on all screen sizes (to provide enough room for the caption to fit in) while cropping the sides of the images to fit on the smaller screens
- legacy mode – is intended for sliders where the images are important and caption text is very short or non-existent; this setting shrinks the images while maintaining their aspect ratio and complete visibility, resulting in very little room for captions on the narrowest screens
- Use (R) to hide the caption titles when they are not needed
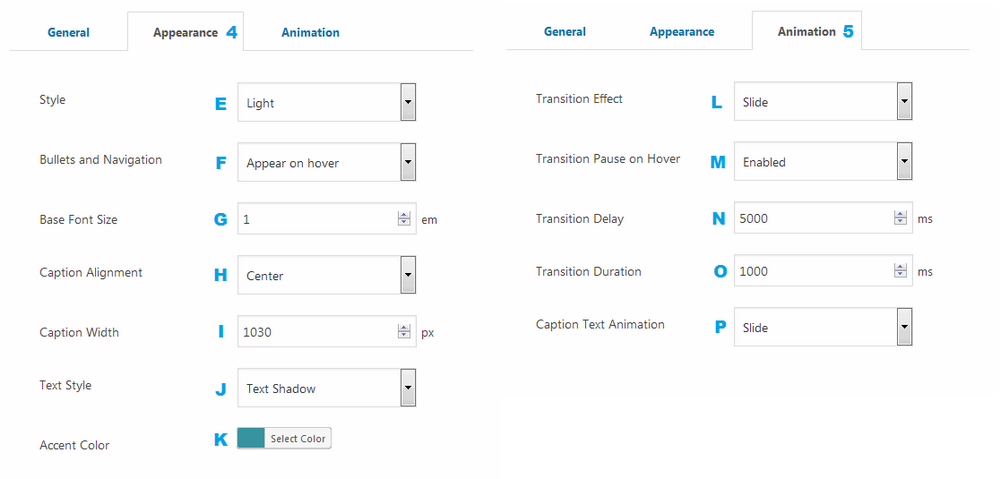
4. Appearance
- Slider appearance style (E) – chose from 7 appearance presets: Light, Light 2, Dark, Square, Tall, Caption Left and Caption Bottom; the last, Cryout Theme is a special style that can be used for best integration with our own themes.
- Adjust the visibility of the navigation arrows and bullets (F) between always visible, always hidden or appearing on hover.
- Adjust to increase or decrease the base font sizes (G) of the caption.
- Adjust the caption text alignment (H) inside captions – left, right, center or justified.
- Limit the caption maximum width (I), in pixels
- Caption appearance style (J) – choose from 3 presets: none, text shadow or text background color to increase the visibility of the caption text.
- Choose the accent color (K) (used differently depending on appearance style on slider elements like buttons, bullets or arrows)
5. Animations
- Set the transition animation effect (L) between different slides. Select from 7 presets: Fade, Slide, Overslide, Underslide, Parallax, Horizontal Flip or Vertical Flip.
- Pause (M) transitions between slides on hover
- Transition delay (N): the amount of time (in milliseconds) a slide stays displayed on the site
- Transition duration (O): the amount of time (in milliseconds) the transition effect between slides lasts
- Set the caption animation effect (P) on appearance. Choose from 6 presets: no animation, Fade, Slide, Blur, Zoom In or Zoom Out.
Slides
To create a new slide, click the Add New Slide button in the sidebar.
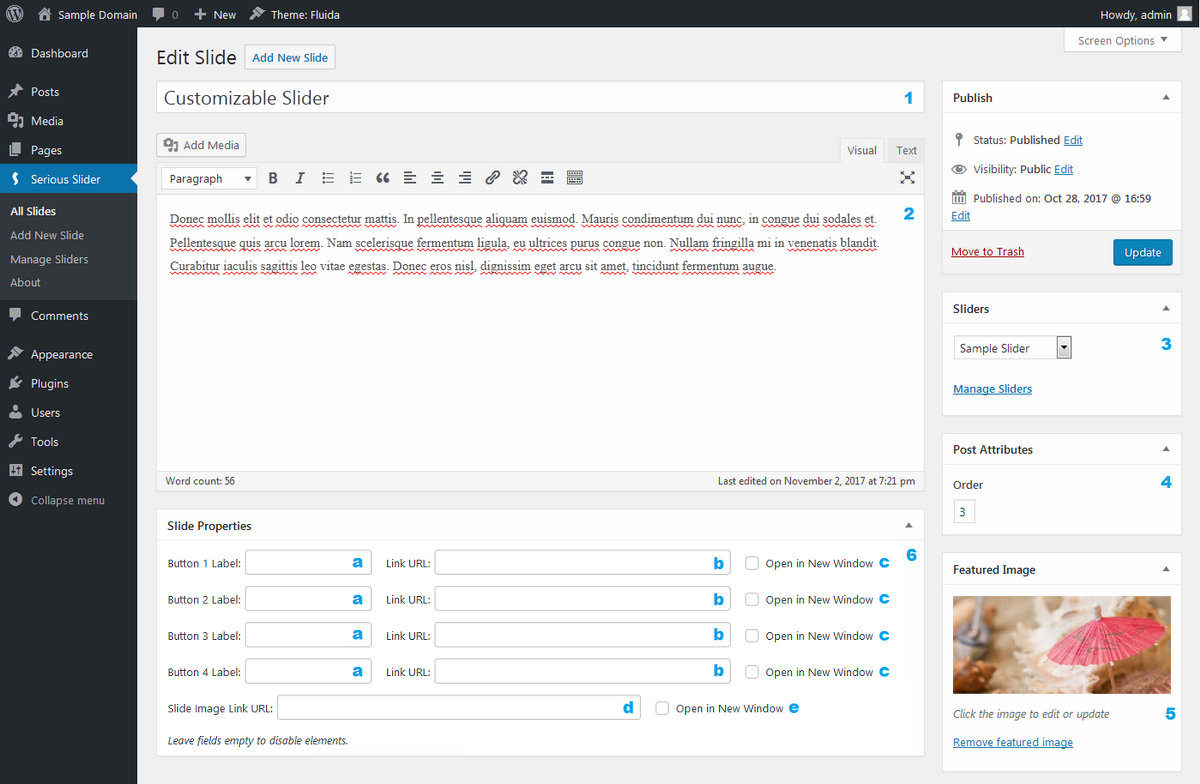
- The title field will be used as the slide’s caption title.
- The content will be used as the slide’s caption text. The content accepts HTML markup.
- Associate the slide with a specific slider. The slider should already exist to be present in the list. A slide can only be associated with one slider at a time.
- Specify an (optional) order value if you’re sorting the slides by the order attribute; otherwise control the slides order by adjusting their publication date and time.
- The featured image is the slide itself. We recommend using images of the same dimensions as the values set in the slider options for optimum results. If using larger images (for high DPI displays), ensure that the images have the correct aspect ratio between themselves and with the configured slider size.
- The slider can display up to four slide buttons (with individual links) on each slide – leaving the label fields empty disables the buttons:
- (a) slide button label fields and (b) link URL fields
- (c) when checked makes the button links open in a new tab/window
- (d) assigns a different URL link on the slide image itself and (e) controls its opening mode
The All Slides page lists all the slides (from all sliders) with some of their attributes: the title, the associated slider, the featured image, publish date and order value.
While hovering over a specific slide row WordPress will reveal the Edit and Quick Edit buttons through which the slide (under the title) or slider (under slider name) can be edited.
The slide image can be quickly set, changed or removed using the available functionality in the Featured Image column.
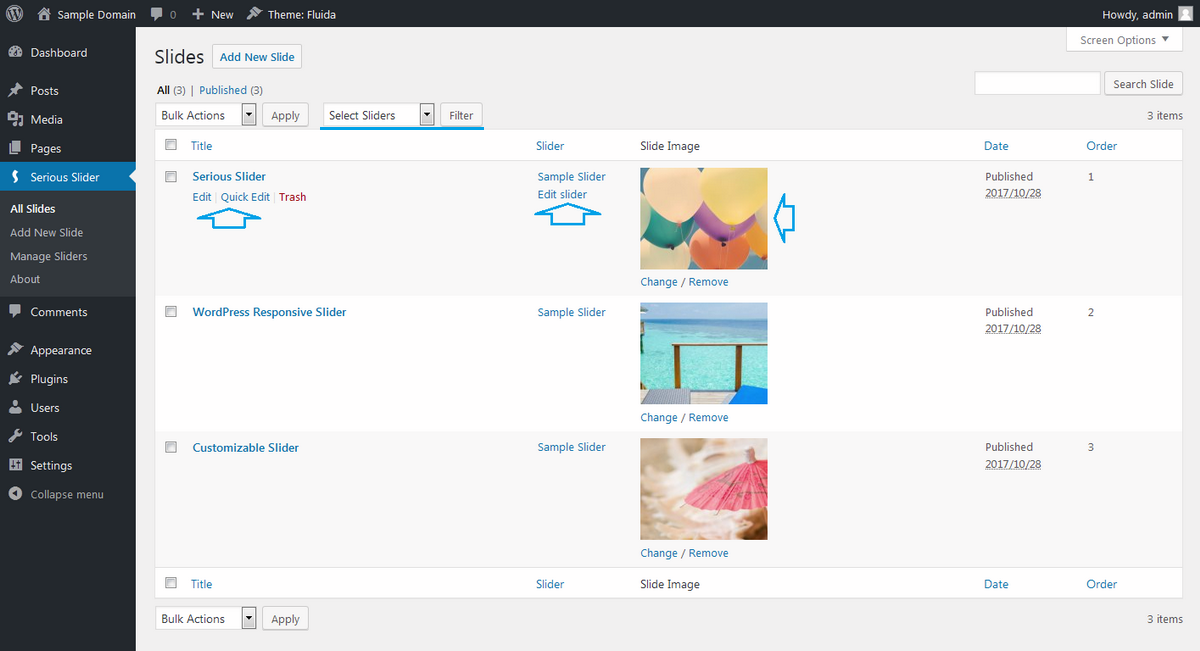
The interface can also list only slides associated with a particular slider using the available Slider filter functionality.
Displaying a slider
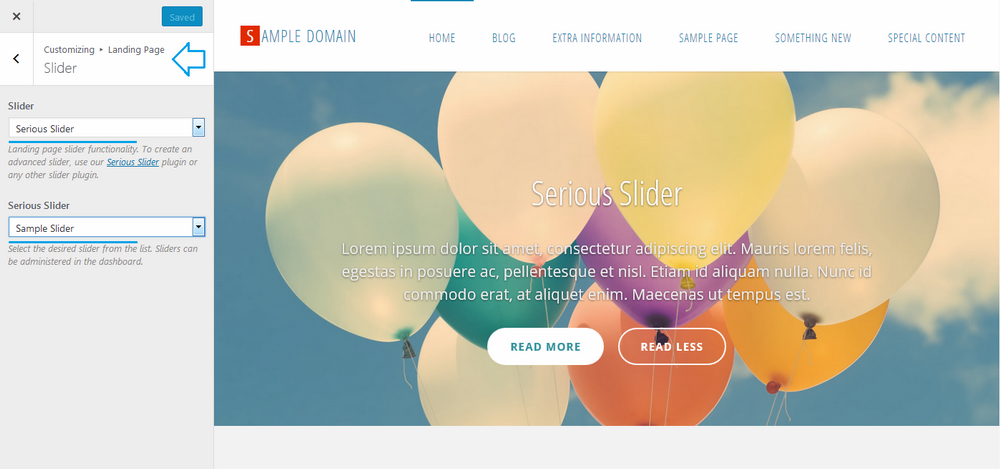
Our customizer-based themes include built-in support for our slider plugin. This is integrated in the customize interface panel, under the theme’s Landing Page » Slider options. Simply select the Serious Slider value for the Slider option and choose the desired slider from the second option.
You can also use the slider shortcode call [[serious-slider id='X']] to integrate a specific slider in site content (inside posts, pages or even input fields), widgets content, text input fields or other locations supporting shortcodes. You can retrieve the exact shortcode/ID for a specific slider from the Define Sliders section.
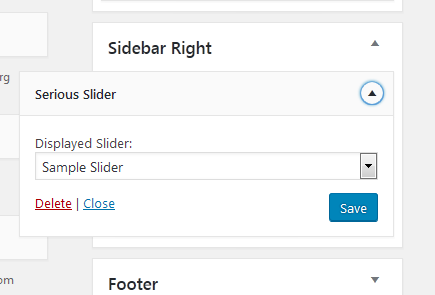
The plugin additionally provides a widget for displaying sliders in widget areas.
The information and features presented in this tutorial apply to the currently available Serious Slider plugin release. We recommend keeping the plugin updates to enjoy the latest features and functionality.
For questions or additional information, you can find us in the forums.
I have two buttons on the slider image, the left button is white with grey text (button background goes clear and text goes white during hover) and the right button shows as clear with white text (button background goes white and text goes grey during hover). Not sure why it’s doing this, assume both buttons would behave the same and there is no control to change that feature. Any help??
I have spent 10 hours so far trying to make Serious Slider work. It does NOT work properly. All the settings aren’t working. What a waste of time (and also money, since I paid for my CryoutCreations Theme. UGH FIX THIS instead of answering the comments with total worthless tutorial links.
Hi, there seem to be an issue with the Cryout theme and Brava. Esch time i activate Cryout theme with slider on the landing page. Title and caption disapear out of the page. Is there a css file that i can edit ?
Best
horticulture.christellebellini.com
Hi – I want a single H1 header that stays the same for all slides on a page. If I add the same header to each individual slide, it shows as multiple instances of H1 on the same page – not pleasing to Lord Google. Any way to add the header just once so it is visible on all slides?
Hey, can I also include an interactive world map instead of an image + link(s), e.g. plugin: Interactive Geo Maps by Carlos Moreira
Is it possible to add multiple new slides to an existing slider – when I go to a slider and Manage Slides>Add New Slide, I only get a new “post” type input rather than Add Media where I can select multiple media or uploads. Thanks
While the “Documentation” may be complete…it sure does not help a novice like myself create my first slider. It took me a few days to figure out that I did NOT want to click the “Add Media” button to select my picture for the slide. That is done on the “All Slides” tool. The photo placed by “Add Media” actually shows up as a picture within the picture. Very confusing!
I just figured out how to get rid of that “picture in picture” and now I’m going to try to install a button…
Perhaps a “Step by Step” set of instructions would be helpful. I think I am beginning to understand what the text space on the “Add New Slide” tool is for…but I don’t know that I’ve ever seen a website that would employ that. I don’t think you demonstrate that feature anywhere. Nice Idea to be able to place all sorts of textual material in a slider.
In spite of all the confusion, finally getting my slider to work was a real joy. It’s beautiful! Thanks for creating this feature.
hey, I have Roseta theme and wanted to put there the slider, but nothing happens… I still have the head image in there and even if I disable it, I don’t see anything and I just have a huge grey block in there. What should I do?
Hi Zed, I really like this slider and it looks good on a PC. On a mobile though, the button is pushed off some slides by the caption and pushed under the circles telling you how many slides there are on others. Is there any way to stop this other than having super short captions? It would also be nice to choose a different button style of just have a regular link, as the shape of the button doesn’t look great with all themes – I’m using roseta and the style of header links in that theme would be nice to have in the slider too. Thanks
I use this slide but transition effect not working, how can i fix?
Have you a date when Serious slider will do this (video slider) ?
While that is a planned feature, we do not have a reference timeframe for when it might be ready.
It’s quite limited and fickle, even if it is free. I don’t have a lot of text to add and i want it displayed on 3 rows but it displays it on 2 and none of the usual HTML code works to move the rest down a row.
I’m better off making it in photoshop i guess, shame.
I clicked on Documentation and ended up here, none of it helps me really.
A separate page explaining what if any HTML still works would be nice.
Hi,
[serious-slider id=’X’]
And what is X here? I do not see any id in sliders list.
There is a shortcode column on the sliders list screen where the ID is included. The same shortcode is also displayed on the right side on each slider’s edit screen.
Does the slider support animated gifs?
The slider supports all image formats accepted by WordPress’ media handler.
Can I use this in place of the default slider in the Nirvana theme?
Nirvana’s built-in slider can be changed with any slider plugin of your choice.
Hello, I create my slider and I choose it from drop menu, but I cannot see it on my homepage… it work only on standard page. I was working on localhost may be that is the problem? thank you!
Hi, it looks like I can not display the caption outside the slide, f.i. under or above the slide. Or am I missing something?
Hello. This slider is very good but just it is not responsive. On mobile phone images don’t fit to screen. Do I make anything wrong?
I am having the same issue. can’t figure out how to make it responsive to different screen sizes. Also can’t figure out if I can add a custom size thumbnail to make that happen as an alternative. There’s no option that I can see?
Is there a way to make the slide take up the full screen?
What about the option to auto display latest posts in the slider?
Like in Nirvana?
We have that written down for a future plugin version.
That would be great!
Is there anyway to use this to display a slider video?
Our slider plugin does not yet support video slides.