
Our commercial version of the HTML Module for OpenCart 1.5 has been released.
The modules includes all the features available in the free version:
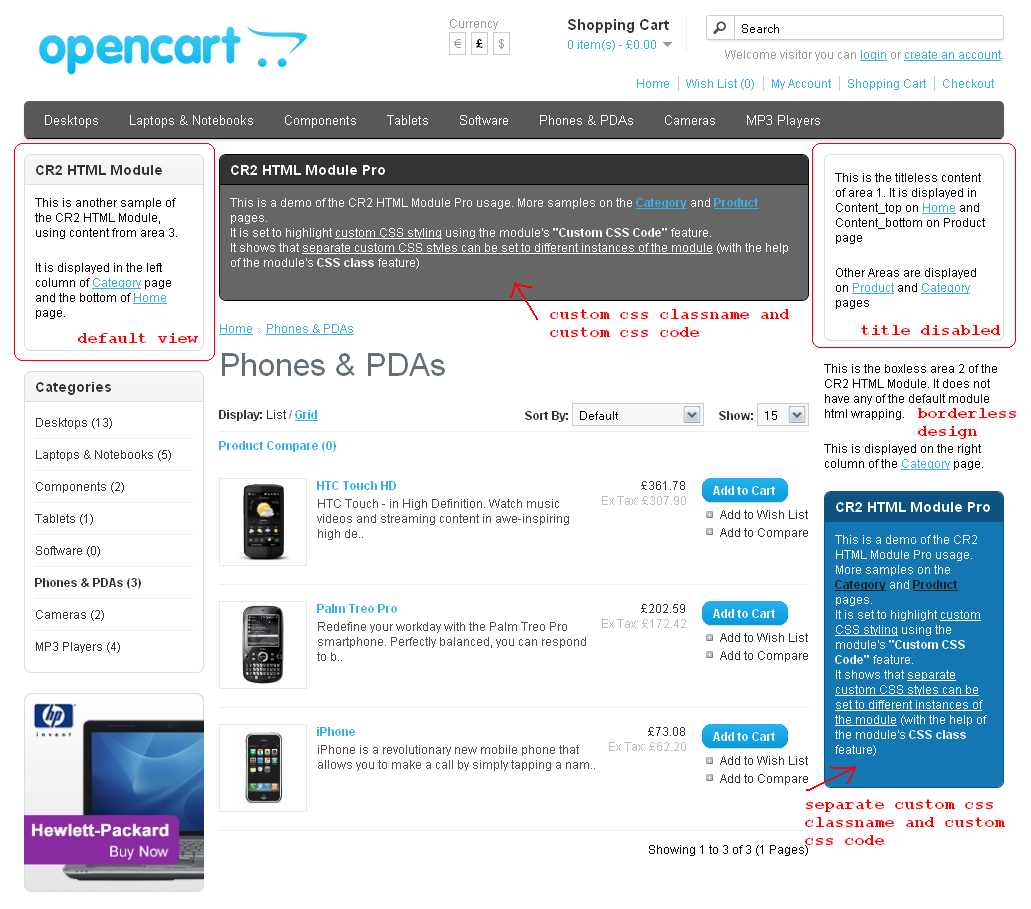
- the ability to add your own HTML code anywhere in the shop
- custom title support (which can be completely disabled)
- borderless design support (the wrapping html for the module can be completely turned off)
- custom css class support (the module div can be customized using the user chosen css classname)
plus the following pro-only features:
- support for a total of 10! (7 more than the free version) different html areas – all these 10 areas can be displayed multiple times throughout the shop
- support for custom css code output – to customly style the html module (or anything else for that matter) without editing the theme files
- support for automatically styled and coloured boxes (dark, blue, red, green and yellow), useful for quickly displaying messages throughout the shop (added in v1.5b)
Live demo: http://demos.cryoutcreations.eu/opencart/modules/
The module can be purchased from the OpenCart Extensions Directory.


In the live demo “Custom Menu Items” with CR2 Alter Menu shows a different color. The page suggests editing the Custom CSS code in the CR2 HTML Module Pro but I don’t know where to start. I have both installed. Please help!
What I did in the demo and what you wish to accomplish is not a designed feature for either of the modules, but merely a side effect of HTML Module’s CSS feature over the Alter Menu module.
First of, you’ll need to choose one of the HTML areas, leave it empty, set it to hide the title and to be borderless, and add it as a module for every layout on which you want the menu items to be CSS styled (I’m guessing you’ll want this on the entire store, so you’ll most likely need to add Area 1 for all the 11 default layouts.). Choose Content Top as the module position (no other customizable options matter for what we are trying to achieve). This first step makes sure the CSS code you’ll write in the HTML Module will be outputted and will apply to the menu on all of the store’s pages.
Now, depending on your theme (I will assume the menu is displayed in the #menu div), and what you are trying to achieve, various CSS rules may be written in the CSS Code box.
For example, to achieve the same effect as I accomplished in the demo, use
#menu ul li:nth-child(7) {font-weight: bold;
text-shadow: 0 0 5px red; }
#menu ul li:nth-child(7) a { color: yellow !important; }
This rule applies a colour and boldness to the 7th menu element (7th li tag inside the ul tag inside the #menu div). To style any other menu element, replace 7 with the number of that element. If you want to style 2 ( or more) menu items, just add them to the declaration, separated by a comma:
#menu ul li:nth-child(2), #menu ul li:nth-child(7) #menu ul li:nth-child(11) { ... }Of course many more customizations may be applied, your CSS knowledge being the only limit here.
Your question did give me an idea on how to improve HTML Module’s CSS feature, making the first step unnecessary, and I will include that improvement in the next release of the module.
after installing free version, we want to buy pro version. do i have to remove free version first?
You may continue using the free version alongside the pro one. They each have their own configurations.