
 |
Adding custom menu items is the easiest things. Just click the “Add menu item” button then fill in the fields. |
| Link Label | Is the text which will be displayed in the menu for that particular link. Note: When setting up multi-language stores, leaving this field blank on particular languages will hide the item on that language. |
| Link URL or {shortcode} |
Represents the link URL. External addresses need to start with http://, eg: http://www.somedomain.com/page. If linking to in-shop (relative) URLs, making them absolute is the recommended way, eg: /in-store-subpage-url.html. Inserting a shortcode in the URL field will automatically add a menu item to the specified shortcode section (with the needed dropdown menu if necessary). See the “Shortcodes” section for a list of available shortcodes. |
| Status | Enable or disable the display of the custom menu item (hide the item without deleting it) |
| Order | Set the order in which the items appear. Items with same order number (or with order unspecified) will be sorted alphabetically. |
| As of version 0.9.3a the module no longer displays menu items with no label for the current language. This way you can add separate menu items (with separate links) for separate languages. |
|
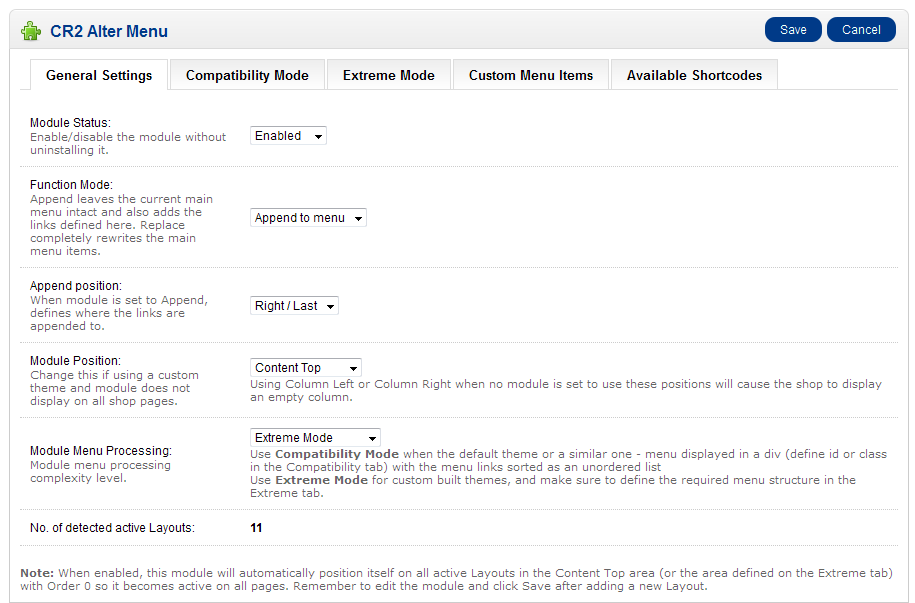 |
| Module Status | Enables or disables the module. Use this instead of Uninstall to disable the module without loosing its configuration. |
| Function Mode | Replace menu – overwrites the entire displayed menu, removing all the existing menu elements. Note: You need to leave at least one parent category set to “display in top menu”, otherwise OpenCart hides the menu completely and the module no longer works. Append to menu – adds the user defined menu items to the current displayed menu without removing or replacing them. On highly customized themes, Replace Menu will always work, while Append to menu might work incorrectly or not at all. |
| Append position | Used when Function Mode is set to Append to menu. Will choose the side of the menu on which to append menu: Left / First will add the user menu items to the left side (in the beginning) of the existing menu Right / Last will add the user menu items to the right side (in the end) of the existing menu |
| Module Position: | Select the area where you would like the module code to be outputted. Recommended settings are Content Top or Content Bottom. Left Column and Right Column would display an empty column in the shop when no other module is set to be displayed in the Left/Right Column on the page. Only change if the module is not processed (does not modify the menu) on all of the shop pages. |
| Module Menu Processing | Instructs the module how to process the theme’s menu:Use Compatibility Mode when the theme is close to the default one, particularly if the menu HTML looks something in the lines of:Note: The menu item ID/classname is defined in the Compatibility Mode tab.Use Extreme Mode on customized themes, where the menu HTML looks nothing like the one above (or when the menu appears to be similar to the one above, but the module fails to work). You will need to further customize options in the Extreme Mode tab. |
| No. of detected active layouts | Will display the number of currently defined layouts in the shop. You will see a notice if the number of layouts is below 11 (the default number of layouts included in OpenCart 1.5) and above 1 because that means the module may not get run on all pages (in case you are missing the ‘default’ layout). |
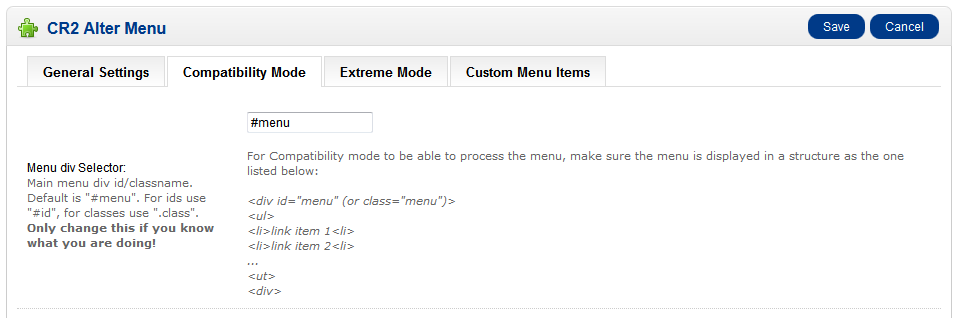 |
This tab is only used when Module Menu Processing in the General Settings is set to Compatibility Mode |
| Menu div Selector | Defines the menu holder tag ID or classname. When defining an ID, include the #, when defining a classname, include the dot. Examples:#menu .mainmenu #the_menu .top_menu |
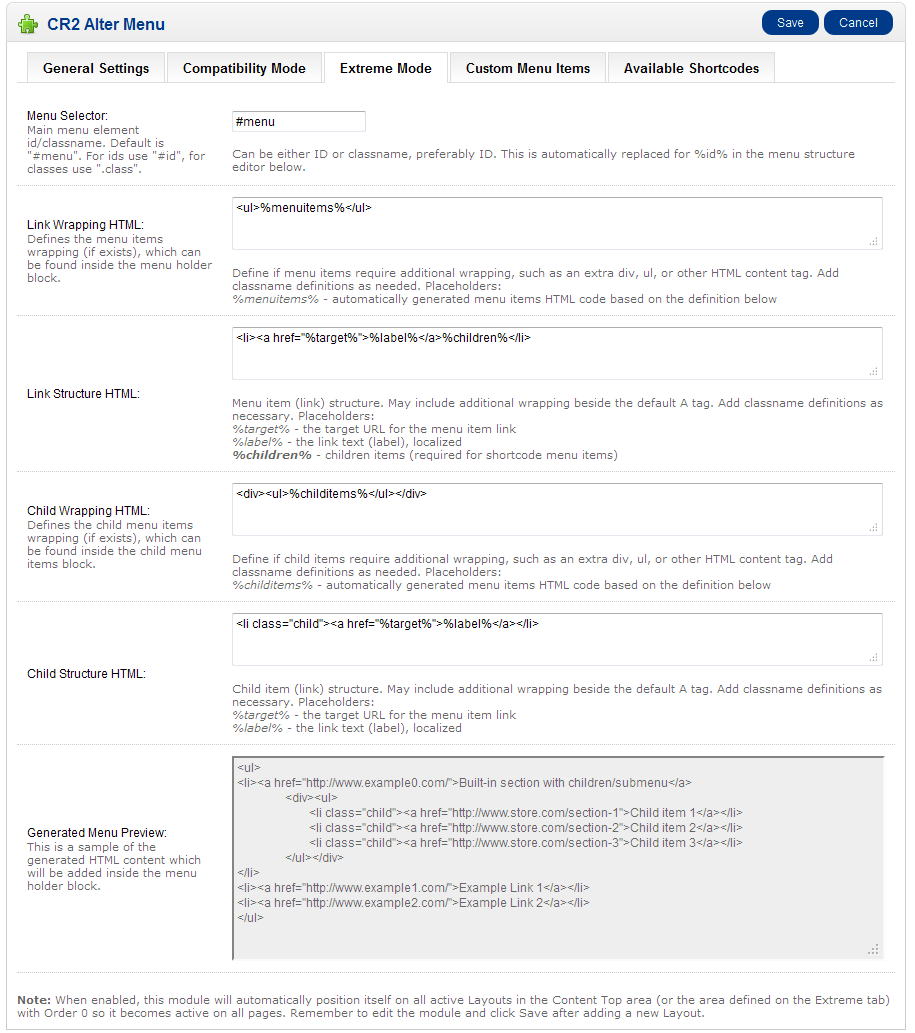 |
This tab is only used when Module Menu Processing in the General Settings is set to Extreme Mode |
| Menu Selector | Defines the menu holder tag ID or classname. When defining an ID, include the #, when defining a classname, include the dot. Examples:#menu .mainmenu #the_menu .top_menuIf you are familiar with jQuery selectors, this field can use any selector that jQuery supports, and can, of course, select any other HTML tag beside divs. |
| Link Wrapping HTML | This is the top level HTML code surrounding the custom link(s). It may be any html (or none at all). %menuitems% will be replaced with the HTML generated by the module according to the Link Structure HTML definition below. |
| Link Structure HTML | This is the link custom HTML code. %target% is automatically replaced with the link URL %label% is automatically replaced with the link label (localized according to the active store language). %children% is automatically replaced with children items (required if using shortcodes that generate dropdown menu items) |
| Child Wrapping HTML | This is the HTML code surrounding the custom drop down menu items. It may be any html (or none at all). %childitems% will be replaced with the HTML generated by the module according to the Child Structure HTML definition below. |
| Child Structure HTML | This is the dropdown menu item custom HTML code. %target% is automatically replaced with the link URL %label% is automatically replaced with the link label (localized according to the active store language). |
| Generated Menu Preview | will give you a preview of what the generated menu HTML code will look like (so you may compare with the existing one and see if you have defined the correct wrapping and structure HTML). |
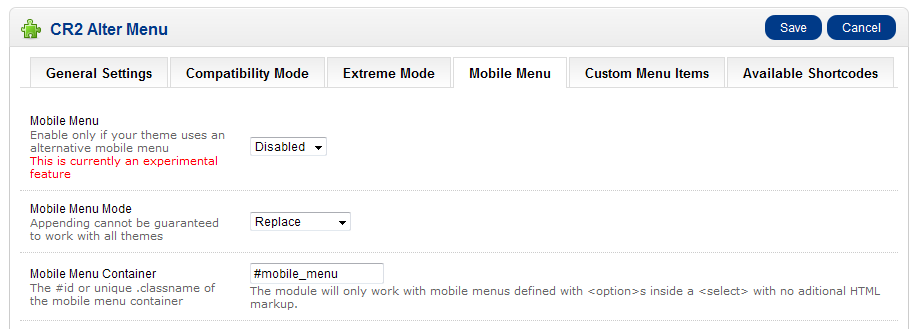 |
This tab controls whether or not the module should also process the theme’s alternative mobile menu |
| Mobile Menu |
Enable or disable the functionality. When enabled, the module will try to process and replace the theme’s mobile menu. This feature is currently experimental. The module will only work with <select> tags as mobile menu containers. |
| Mobile Menu Mode |
Select how the mobile menu should be processed: replaced completely or appended left/right. |
| Mobile Menu Container |
Enter the ID or site-wide unique classname of the <select> object containing the mobile menu. |
| Shortcodes are entered instead of the custom item URL, to include OpenCart built-in content in the menu. | |
| Available shortcodes: | |
| {categories} | – will add parent categories checked as “display in the top menu” to the menu (via dropdown) |
| {categories_all} | – will add all store parent categories to the menu (via dropdown) |
| {category=ID} | – will all sub-categories of category with specified ID (via dropdown) |
| {informations} | – will add all information pages to the menu (via dropdown) |
| {informations_bottom} | – will add information pages checked as “display in the footer” to the menu (via dropdown) |
| {manufacturers} | – will add all manufactureres to the menu (via dropdown) |
| {account} | – automatic link to the user account |
| {cart} | – automatic link to the cart page |
| {contact} | – automatic link to the contact page |
Last revision: 20130508.096